Easy 4-step Banana Loaf

Hello again! I’m baaaaack! 

It has been quite a while since I’ve been on this little blog of ours, however, it’s time to give it some love again and share some of the things we’ve created during the past few months. I’m going to start off with an easy recipe, but there will be all sorts flooding this way soon. 

I know a lot of people who say they can’t bake and this is a recipe that even those who can’t bake can bake. All you need is a loaf tin and the ingredients all of which will probably be found in your cupboard and lets face it, there’s always at least two brown, spotty bananas that someone doesn’t want to eat!

Ingredients are as follows:

100g – butter (I used stork)
175g – caster sugar
225g – self-raising flour
2 – eggs
2 – ripe bananas (mash them in a bowl first)
1 tsp – baking powder
2 tbsp – milk

  1. Pre-heat your oven to 180°C/350°F/Gas Mark 4
  2. Lightly grease your loaf tin and line it with non-stick baking paper. I use the paper from Tesco’s that specifically says baking. Do not use the greaseproof paper – it is absolute pants and if you’re like me, will end up in a corner crying because your cake is stuck and looks like a crumbly mess. 
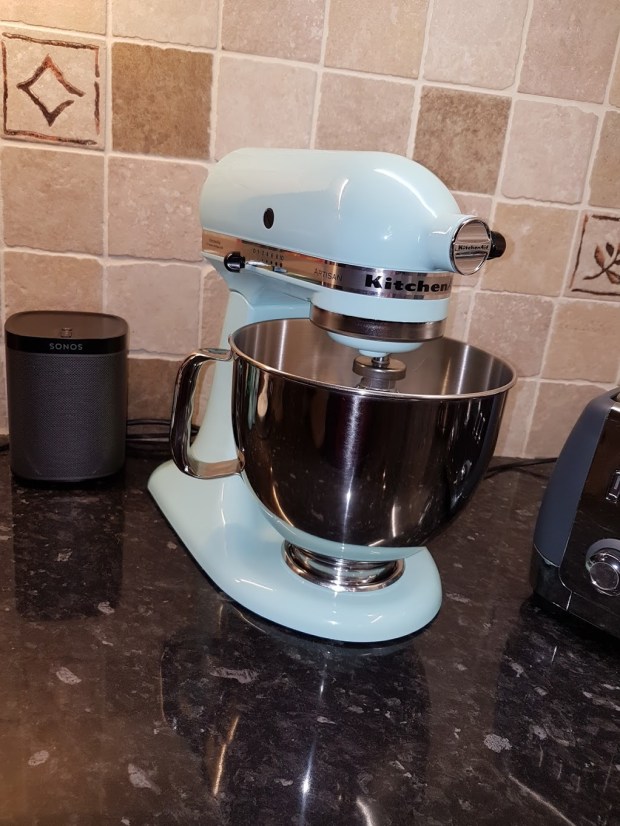
  3. Anywayyyy… Measure out the ingredients and put everything into the mixing bowl… e v e r y t h i n g!! Don’t bother mixing the butter and the flour first or whatever recipes usually say. Lob it all in together and mix. Obviously I used my Kitchen Aid as per usual, however any electric mixer works, but only mix for around 2 minutes or until you have a thick cake batter. You can beat it by hand, but your arm might drop off – so there’s your warning!
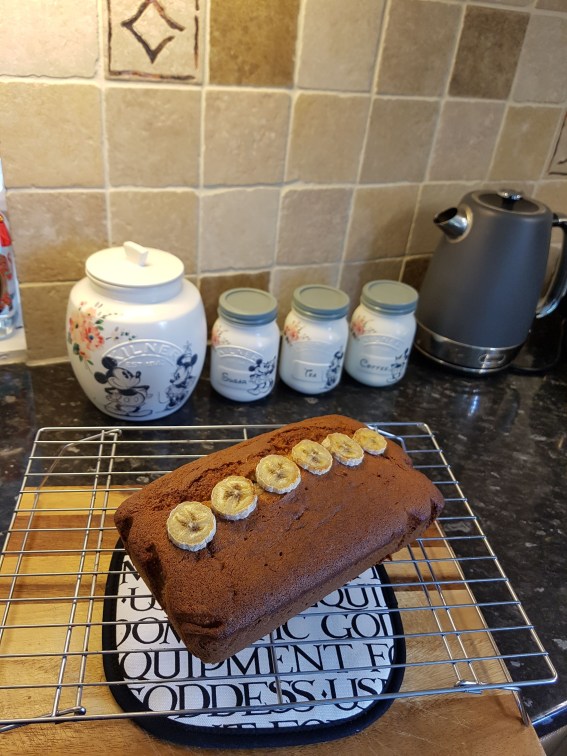
  4. Next up, spoon the mixture into the prepared tin, level it off a little and shove it in the oven for 1 hour. Add slices of banana on top and pop it back in the oven until the cake looks brown on top. Make sure you’ve got a cake poker too and if, when you poke it, it comes out clean you can take it out!

I tend to take the cake out of the tin after a few minutes and then place it on a wire rack to cool, but make sure you take off the baking paper! 

…and voila. Here was my creation. Enjoy and let me know how yours turns out on here or on Instagram

Sx

20180827_152319


A Hood Start

Hello there – it’s time to make a little start on this blogging lark I think!

This is something I’ve never really done before, but always wanted to. I have a passion for writing and since we have recently set up an Instagram page mainly for home inspiration I thought why not blog along side it too.

We bought our lovely home in August 2016. We are both first-time buyers and fell in love with the first home we went to see. In fact, I think I probably fell in love with it years ago as I used to drive past it every day. We were very lucky and our offer was accepted very quickly. It had everything we were looking for:

 Detached
 Garage
 Off-road parking for two cars
 Large garden for dog
 3 bedrooms

…and it had even more which I’m sure we will show you over time or you can take a look at our instagram @ourhoodhome.

I’m hoping this blog will be full of home interiors/exteriors, tips, possibly some recipes, probably a lot about or puppy-dog and mainly just a little bit of life!

Sx


Engaged.

Excitingly my other half proposed to me whilst we were on holiday in Mauritius last November. (I’m sure we’ll make a post about Mauritius at some point – it was truly beautiful!) It wasn’t something I expected, I especially didn’t think he’d have the nerve to transport a ring all the way there without me suspecting anything, but low and behold he did!!

We told my grandparents and they were extremely elated, however they didn’t know what to buy us. We obviously didn’t want nor need a gift from anyone. We bought our house the year before and have no need for new toasters, kettles or similar household items. However, they wanted us to have something memorable, something we could keep forever and then we found this – FACED.

I actually found FACED on instagram a while ago and was dead set on getting a portrait of the three of us for the hallway waaaaaaay before an engagement was even thought of. I loved the idea that it wasn’t selfie or a professional photograph. It’s unique and our family/friends can quite clearly see the resemblance.

Screen Shot 2018-02-28 at 11.54.26

The whole process was easy. You simply e-mail through photos those you want to be FACED along with any other requirements such as a date, a love heart, colour shirt, etc. I would presume that most things are possible! You get a proof to review before the final is printed which I thought was a great idea as there were a few things we altered. It arrived quickly and we managed to get it before Christmas.

My grandparents love it. They love that we will always remember what they funded to remember our special engagement. It really is a beautiful gift and I would highly recommend it!!

Sx

3, 2, 1 – Let’s BAKE!

Baking. There’s a love-hate relationship between me and baking, however it was all made a little easier when this little beauty below came into my life almost one year ago.

20170323_191331

Yaaaas – my better half bought me this beautiful KitchenAid for my birthday last year.

I cannot recommend one of these highly enough, however I really want to stress that you do not need a KitchenAid or any brand of electric mixer to bake. Go freehand like my Nan always used to. It’s always especially fun (and messy) that way if you have little kiddies!

Anyway, my love for my KitchenAid is HUGE. I couldn’t live without it now, and I’ll show you some bakes and recipes in the future, but I wanted to show you have easy it is to make bread without a bread maker!

This recipe from Paul Hollywood is what I used and the ingredients are:

  • 500g strong white bread flour
  • 10g salt
  • 10g instant yeast
  • 30g unsalted butter, softened
  • 320ml cool water

I think the recipe looks a little daunting, but here’s my take:

  1. Put your flour in a mixing bowl. Put the salt on one side, yeast on the other, butter in between.
  2. Add water slowly and get your fingers in there (or use your electric mixer if you have a dough hook)! Round and round until all the water has picked up all the ingredients and there’s no flour left in the bowl.
  3. Knead, knead, KNEAD until it’s silky smooth. Or just turn your mixer on and whack it round your mixing bowl for 5 mins. There is no right or wrong way of kneading. Just whack it around for a bit.
  4. Make the dough into a flat round shape and put it in a lightly oiled bowl somewhere warm with a tea-towel placed over the top. I don’t leave it for a specific amount of time. Just enough time for it to rise slightly so we’ll say maybe 1.5 hours?
  5. Whack it, whack it and beat it. Get all that air out, stretch it a little and then make sure it’s silky smooth again. This time we’re going to place it in a loaf tin and pat it down at the edges. Then cover it in a food bag, but make sure there’s plenty of room for the dough to rise. OH and pre-heat a fan-oven to 230°C with a tray in the bottom.

    20180227_144300

    Dough in loaf tin brewing in front of our log burner!

  6. Once it has doubled in size or is over flowing, take it out the bag and pop it into the oven on the middle shelf. Add water to your pre-heated tray in the bottom to create steam and leave it DO NOT TOUCH for 30 minutes
  7. …and VOILÁ – BREAD!
    20180227_164117.jpg

    Take it straight out of the tin after 30 minutes in the oven. Fresh bread… Mmm…

    Let me know if you make any! Remember, you do not need a mixer or bread maker. This can be made easily using your own fair hands. Do not forget to add the water into the pre-heated tray else you’ll end up with 90% crust, 10% bread!

Sx